The Wardrobe
There came a point during my planning of the nursery when I realized that our little one would not have sufficient storage, despite the fact that there's a double closet in her room. Unfortunately, the closet is already crammed full with some of Mr. H's clothes, his suitcases and extra bedding. I had originally intended on purchasing an Expedit bookcase, filling it with all sorts of drawers and boxes and using that as storage (At the time, I was still under the impression that I would be using the dresser as a changing table and the monster of a console table would be leaving the room).Mr. H. stumbled upon the PAX wardrobe systems on one of our trips to IKEA, and he was convinced this was what we were going to get. I was not so convinced. In fact, it took two trips to IKEA to get me on board. I thought the concept was great, but the price tag and the size of the system was a little much. But I was eventually sold on the idea, and the cost was justified by reasoning that this wardrobe can change and grow and be adapted to our needs (or our daughter's) over the years to come. Plus, it was pretty cool picking out what elements to put inside it. This system is 100% customizable.
Normally I'm not a white furniture kind of person, but Mr. H. insisted that we get white because he didn't want any dark, menacing furniture in the baby's room. Fine. However, since we were unable to paint the walls of the room (we rent), I decided that the wardrobe needed some color. And not just any paint color would do. I wanted chalkboard paint.
Check out the makeover...
The basic PAX wardrobe we purchased.
Supplies:
PAX wardrobe ($320.00*)
Tack cloth (Leftover from dresser redo- $0)
Primer (Leftover from dresser redo- $0)
Pea Pod chalkboard paint (Rust-Oleum Tintable Chalkboard Paint- $12.98)
Deep Teal chalkboard paint (Leftover from dresser redo- $0)
Painter's tape (Leftover from dresser redo- $0)
Paint tray and high density foam roller with extra cover (Leftover from dresser redo, and new cover- $2.50)
2 foam brushes (1 from dresser redo, 1 new- $0.67)
Paint stirrers ($0)
Rags and drop cloths (already owned misc. sheets and towels- $0)
* price includes frame, 2 doors, 2 basket drawers, 1 easy access drawer, 2 SKUBB storage box sets, 2 shelves, 1 clothes rack, and all necessary hardware.
** price includes shipping
Yellow spray paint for hardware (Leftover from artwork project- $0)
New hardware (Purchased from Etsy- $8.25**)
Total Cost: about $344.40New hardware (Purchased from Etsy- $8.25**)
* price includes frame, 2 doors, 2 basket drawers, 1 easy access drawer, 2 SKUBB storage box sets, 2 shelves, 1 clothes rack, and all necessary hardware.
** price includes shipping
Taped and painting the pea pod (love!). I think I went with four layers of paint for this project as well. I had some difficulties getting the nice clean edges that I wanted. I prefer not to talk about it.
Now the deep teal.
For some reason I thought I had a full pic of the wardrobe, but I guess not, and I'm too lazy to go take one now. You can't see the hardware on the doors (because it's not on yet), but scroll down and check out the knob on the nightstand. Same thing.
The Nightstand
I realized that I needed some sort of table next to the rocking chair for whatever necessities I might need during feedings. I liked the idea of adding chalkboard paint to the top so I could make notes or jot down any ideas I might have during late night feedings. It might not be as practical as I think, but at the time it seemed like a good idea. I searched and searched for the perfect table and ended up just getting one from Walmart (I already have the same nightstand in a dark color next to my bed). This project turned out okay, but as with the wardrobe, I had a VERY hard time getting the clean edges that I wanted with the painters tape that I used. I ended up having to hand paint the edges. It's not nearly as clean and neat as I imagined, but close enough.
And the transformation...
And the transformation...
The night stand (but imagine it's in white)
Supplies:
Curved night stand, white (from Walmart- $32.00)
Tack cloth (Leftover from dresser redo- $0)
Pea Pod chalkboard paint (Leftover from wardrobe makeover- $0)
Deep Teal chalkboard paint (Leftover from dresser redo- $0)
Painter's tape (Leftover from dresser redo- $0)
Paint tray and high density foam roller with extra cover (Leftover from dresser and wardrobe projects- $0)
2 foam brushes (1 from dresser and wardrobe projects- $0)
Paint stirrers ($0)
Rags and drop cloths (already owned misc. sheets and towels- $0)
Yellow spray paint for hardware (Leftover from artwork project- $0)
New hardware (Purchased from Etsy- about $4.00**)
Total Cost: about $36.00**price includes shipping
I taped off a border to mimic the curve of the night stand.
It looks okay here, just don't look too closely.
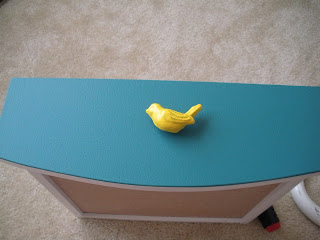
Switched out the plain white knob for a yellow spray painted bird knob.
The finished stand, which coordinates nicely with the dresser and the wardrobe.
Switched out the plain white knob for a yellow spray painted bird knob.
The finished stand, which coordinates nicely with the dresser and the wardrobe.
Other nursery project posts:


awesome!! they look great! The nursery must be so cute!
ReplyDelete